

My first card was inspired by a card I saw which was created by Dorothea Keiling , thank you so much for the inspiration , Dorothea ! I am not sure of the name of this card as I have searched and I have seen that some are calling it a votive card and others are calling it a concertina fold . I searched and was unable to find a tutorial for the base of the card using A4 card stock so I made my own !
Here it is :
Cut your A4 CS at 28 cm in the landscape position
In the same posiition , score at 7 cm , 14 cm and 21 cm
Turn and in the portrait position score at 10.5 cm , leaving in the trimmer now cut between the 7 cm and 21 cm score lines .
Score all fold lines and fold in half .
Here is my card front

and inside

and with a tea light LED light inside

I ran my folded insert piece through the Bigshot using the my framelits , gold embossed Santa and his reindeers and cut my trees and deer , then added dazzling diamonds to the trees for some glitter . I used my brayer to add some colour to the DSP on the sides and also the card front .
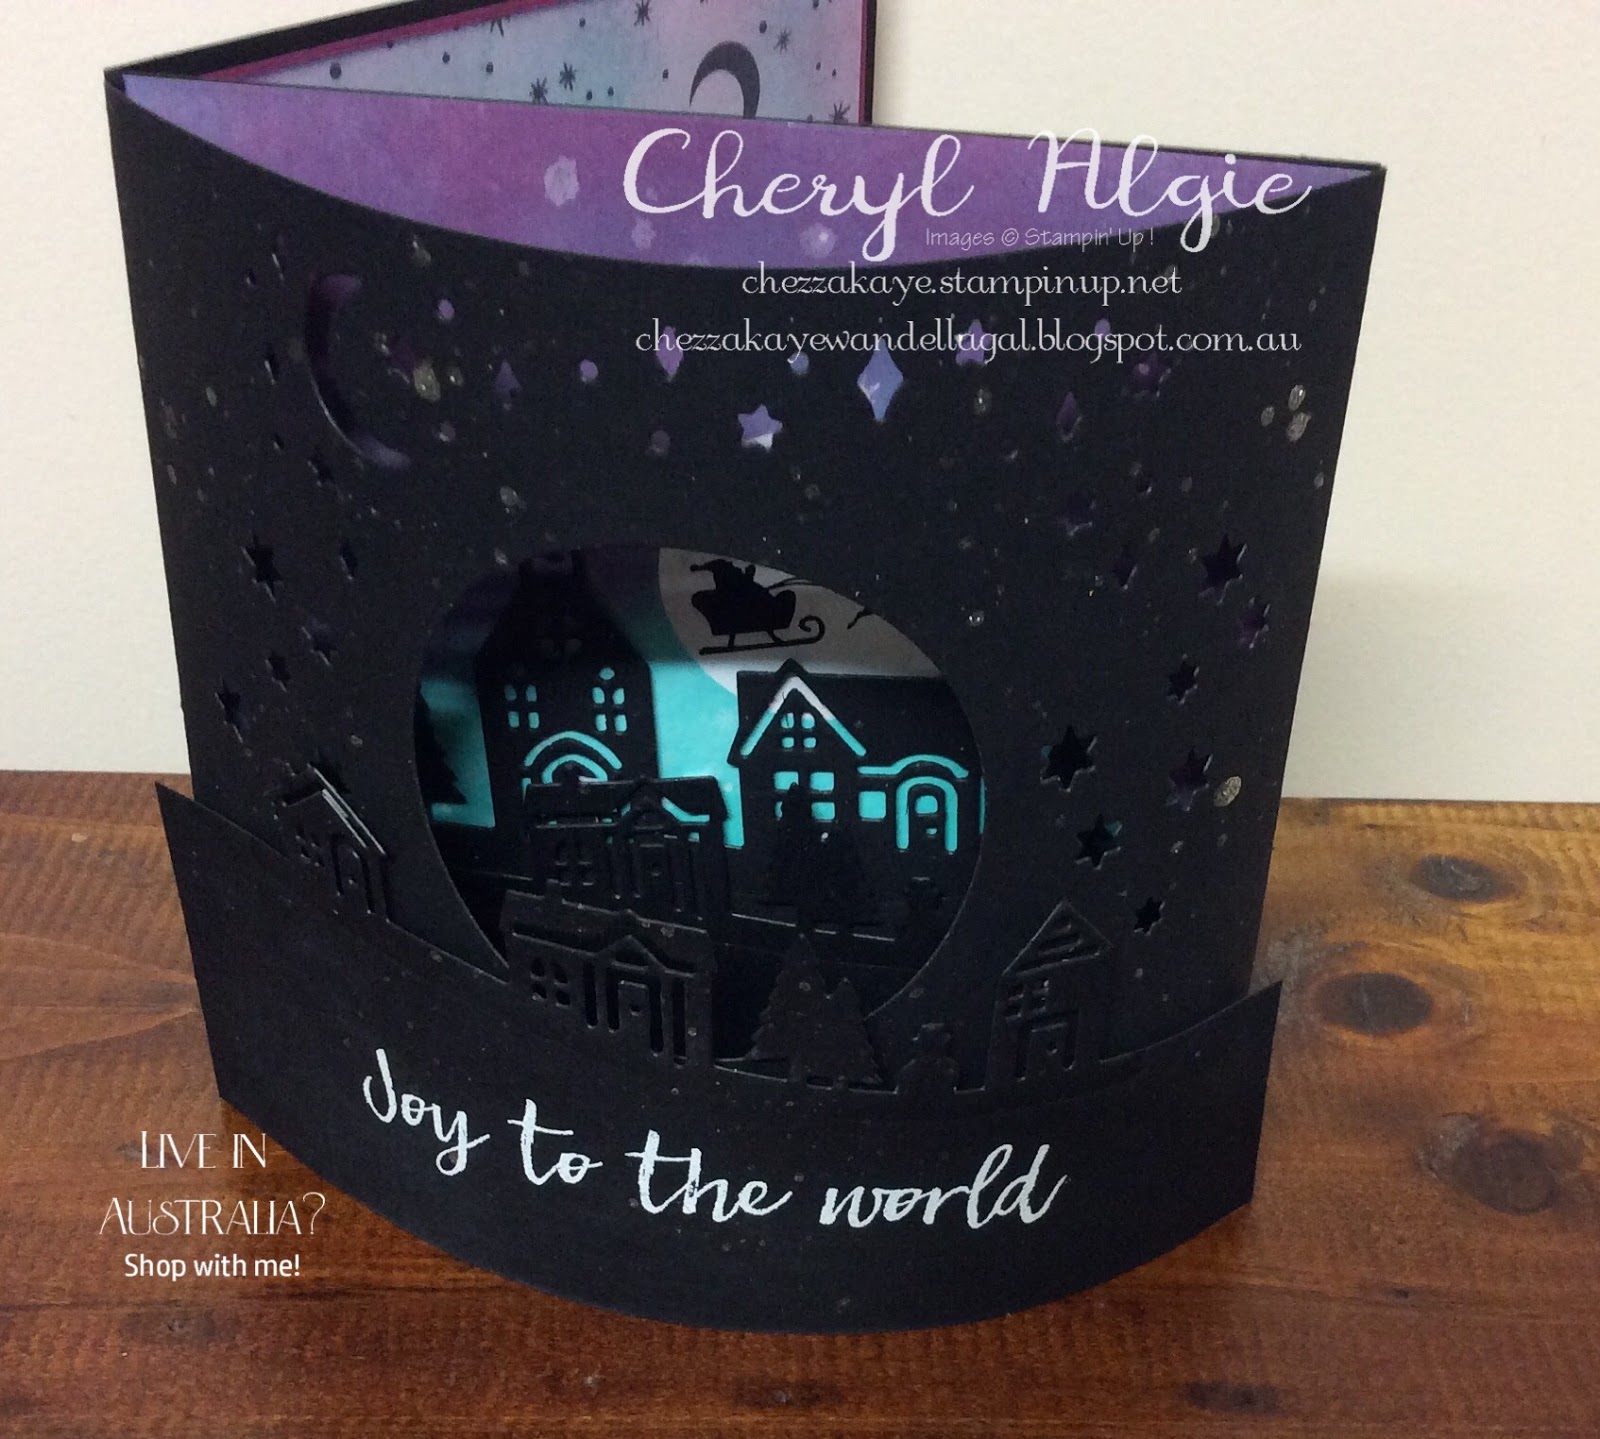
My next card is a domed front card . I had never seen one of these before until I was looking of a special card fold to create for my Mum's 90 th birthday - next weekend , I will post a picture when Mum receives her card . Today's card uses the card design but I have gone with a Christmas theme .
I have also created a box because this card cannot be folded to post .
For the card I used one piece of Basic Black cut at 5 x 10 inches , folded in half for the base . For the bowed front piece I cut one 5 x 8 inch piece , scored on the 8 " side at 1 " and 7 ". for my front art piece I cut a piece of Glossy White CS @ 5 " x 5 " - if I can give you a little tip , cut this piece a teenzy bit shorter on the side that adheres under the bowed piece (on my first two attempts the art piece was buckling when I had adhered it to the card front and cutting it a little shorter widthways solved this problem ) . Thank you Olga Cavanaugh for these measurements . I also watched a you tube video by Intatwyne Designs for ideas on " how to " construct this card . You could also use DSP for the art piece to create a simpler version of this card .
I began by stamping Santa and his reindeers using Memento onto my Glossy CS and punched a circle out of sticky notes to make a mask for the moon . I also stamped the little cluster of stars using Versamark , waited for both inks to dry and then sponged my entire piece using Bermuda Bay ink, next I added some Rich Razzleberry to the top. I used some paper towel to buff after sponging . Some of the gorgeous houses were cut and raised with dimensionals . My bowed piece was prepared by running it through the Big Shot using the moon and stars die from the Card Builder set and also the cluster of stars from Detailed Santa thinlits - use this die twice . I cut another row of houses to add to this piece - it needs to be about 6 " so do measure before cutting , ask me how I know ! I heat embossed the sentiment in white onto this piece and put my card together . As a final touch what card would be complete without a spattering of Wink of Stella , right ?
Open

Laid flat to give a better view of my gorgeous sky background !

For the box , I used a piece of Basic Black cut at 8 3/4 " x 8 3/4 " scored all the way around @ 1 3/4 " and for the lid cut your CS at 8 7/8 x 8 7/8 and score @ 1 3/4 " all the way around also .

Please continue hopping around to see all of the wonderful creations . Next up is the very talented Kim Oliver and I am sure you are going to love her creations
Blog Hop Participants:
5. Peta Stephen
7. Delys Cram
8. Libby Dyson
10. Megan Lenske
11. Cheryl Algie
12. Kim Oliver
13. Sharon Dalton
14. Sue Vine
15. Jenny Hayward
16. Nicole Wilson
17. Narelle Fasulo
18. Cathy Pinchbeck
19. Maree McIntosh
20. Josie Dean
21. Ellen Woodbridge
HERE
Product List


WOW Cheryl, you knocked my socks off with these stunning cards. Thanks so much for the inspiration and for joing the blog hop
ReplyDeleteThanks so much Libby for your kind words . 😀
DeleteWOW Wow Wow I love your work these are great!
ReplyDeleteThanks so much Courtney , these cards are additive ! I just can't stop creating them !
DeleteOMGoodness, I adore both projects but your second one blew me away! FABULOUS!
ReplyDeleteThanks so much Kim ! I love trying new folds !
DeleteOh my! I love all of these projects! xx
ReplyDeleteThanks Jessie
DeleteFar out brussel sprout, those cards are amaaaaazing!!
ReplyDeleteHa ha thanks Megan 😀😀😀
ReplyDeleteStunning projects Cheryl, the second one with it's dark colour scheme is my fav. I love that even though it is quite dark the colours on the base layer makes a beautiful contrast.
ReplyDeleteThank you Moni , I was quite pleased with my projects , I love me something different !
Deletewow Cheryl what wonderful cards - you've been busy!
ReplyDeleteThanks Leonie ! I love to craft and these are so addictive I keep thinking of more ideas to use for them ! Help I think I’m addicted !
DeleteGorgeous as always, you never cease to amaze me, with your creations and love for making beautiful cards. xx
ReplyDeleteAs I always remind you love , I learned from the best ! Thanks for your kind comments Cheryl . 😀😀😀
DeleteWow Cheryl. These are all so amazing. Truly works of art fit for really special people. Such detail. Amazing!
ReplyDeleteThanks Lou , you are so kind . 😀
DeleteI love, love, love your cards.
ReplyDeleteI love these Cheryl and as I have said before you have used my fave colours - love it x
ReplyDeleteOhhh My Lordy....you have made the most stunning cards <3
ReplyDeleteBoth these cards are pretty special Cheryl. So different to anything I have seen. Thanks for sharing these. :)
ReplyDeleteWow what gorgeous projects! They look amazing!
ReplyDeleteCheryl your cards are gorgeous, so stunning.
ReplyDelete